Bootstrap A REST API With Node.js, Express.js, & MongoDB
This guide will walk you through how to bootstrap a REST API using Node.js, Express.js, and MongoDB.
Our REST API will be built using Node.js and the Express.js framework. Express has a robust set of features that will help us build the REST API both quickly and effectively.
Also, we'll use MongoDB for a database and host it in the cloud using Atlas. Atlas will help us focus more on building our application than managing a database, which can be a real pain in the butt. And they have a free pricing tier you can use that is easily upgradeable if you ever needed to do so in the future.
In the first section, we'll bootstrap a new REST API application.
After that, we'll create a MongoDB database in the cloud and connect to it from the REST API application.
Then, we'll go over how to add, update, delete, and retrieve data from the database.
Let's get started!
Table Of Contents
- Bootstrap An Express.js REST API Application
- Create & Connect To A New MongoDB Database
- Add, Update, & Delete Database Data
1. Bootstrap An Express.js REST API Application
The first step is to get an Express REST API application up and running on your local development machine.
Let's get it built!
Create A New Express.js Application
Let's create a new parent folder for the REST API application.
On your local machine, create a new /rest-api directory with this command:
mkdir rest-api
Next, cd into your new /rest-api directory:
cd rest-api
Then, run the npm init -y command to create a package.json file and initiate a new Node.js application at the root of your project:
npm init -y
Then, create a new /rest-api/index.js file that will serve as the entry point to the REST API application:
touch index.js
And add this code to it via your editor:
const express = require("express")

const PORT = process.env.PORT || 5000

const app = express()

app.listen(PORT, function () {
  console.log(`Express app listening on port ${PORT}`)
})
This code will start a server and listen on port 5000 for any requests. And it's also configured to log an Express app listening on port 5000 message when it first starts.
Make sure you save the file when you're done making changes.
Notice that we're using the external Express NPM package, so we need to install it using NPM:
npm install --save express
Now we need a way to run the code we just created.
To do that, we need to add a few scripts to the package.json file.
Open the /rest-api/package.json file in your editor and update the "scripts" section to the following:
"scripts": {
  "dev": "NODE_ENV=development nodemon index.js",
  "start": "NODE_ENV=production node index.js"
},
The first "dev" script will run the REST API application in development mode. And the "start" script will run the application in production mode, which you'll use when the application is deployed to a production environment.
The NODE_ENV variable will be available to the entire application via the process.env.NODE_ENV value. We'll use this to help determine what environment our code is running in.
At this point, your package.json file should look similar to this:
{
  "name": "rest-api",
  "version": "1.0.0",
  "description": "",
  "main": "index.js",
  "scripts": {
    "dev": "NODE_ENV=development nodemon index.js",
    "start": "NODE_ENV=production node index.js"
  },
  "keywords": [],
  "author": "git_username <your_email>",
  "license": "ISC",
  "dependencies": {
    "express": "^4.17.1"
  }
}
Also, you may have noticed that we use Nodemon when running the application in development mode.
This NPM package will monitor the application code for any changes and automatically restart the application if changes are detected. Without it, we would have to manually restart the application every time we wanted to make any code changes.
You can install the nodemon NPM package with this command:
npm install --save-dev nodemon
Now we can give the application a test run.
Make sure you're at the root of the /rest-api project and run this command:
npm run dev
If all went as planned, this should output an Express app listening on port 5000 message in your terminal. This indicates that the Express application is running and listening for any incoming requests.
Install & Configure Helmet
We also want to add the Helmet NPM package to the application. It will make the Express application more secure and can be added to the application in one line of code.
The helmet NPM package is a collection of twelve smaller middleware functions that set HTTP headers for your REST API application. Running app.use(helmet()) will not include all of these middleware functions by default.
But, these are the ones that are applied by default:
- DNS Prefetch Control: lets you disable the browser's DNS pre-fetching by setting the
X-DNS-Prefetch-Controlheader. - Frameguard: stops click-jacking attacks by setting the
X-Frame-Optionsheader. - Hide Powered-By: removes the
X-Powered-Byheader to make it harder for attackers to see what potentially vulnerable technology powers your site. - HSTS: sets the
Strict-Transport-Securityheader to keep your users on HTTPS. - IE No Open: sets the
X-Download-Optionsto prevent Internet Explorer from executing downloads in your site’s context. - Don't Sniff Mimetype: helps prevent browsers from trying to guess (a.k.a. "sniff") the MIME type, which can have security implications. It does this by setting the
X-Content-Type-Optionsheader tonosniff. - XSS Filter: sets the
X-XSS-Protectionheader to prevent reflected XSS attacks.
Install the helmet NPM package with this command:
npm install --save helmet
Then, update the /rest-api/index.js file to both require() the package and add a app.use(helmet()) line of code to initiate it.
When you're done making edits, the /rest-api/index.js file should look like the following:
const express = require("express")
const helmet = require("helmet")

const PORT = process.env.PORT || 5000

const app = express()

app.use(helmet())

app.listen(PORT, function () {
  console.log(`Express app listening on port ${PORT}`)
})
Helmet should now be configured for your application.
Before moving on, verify that your application is still running without any errors.
Enable CORS Support
Cross-origin resource sharing (CORS) allows AJAX requests to skip the same-origin policy and access resources from remote hosts (i.e. websites).
Therefore, we need to configure CORS in the application and restrict AJAX access to only allow the origin of your website. This will allow your website to make requests to the REST API.
When using Express, the easiest way to configure CORS is by using the Cors NPM package. You can install it with this command:
npm install --save cors
Then, open your /rest-api/index.js file and make these two code changes:
require()the cors npm package (const cors = require("cors")).- Add an Express middleware that utilizes the
corsNPM package (app.use(cors())).
When you're done making changes, the /rest-api/index.js file should look like the following:
const express = require("express")
const helmet = require("helmet")
const cors = require("cors")

const PORT = process.env.PORT || 5000

const app = express()

app.use(helmet())

app.use(cors())

app.listen(PORT, function () {
  console.log(`Express app listening on port ${PORT}`)
})
Now we need to configure the cors package to only allow cross-origin requests from the origin for your website. In development mode, you can allow requests from anywhere. But, in the production environment, it needs to match the origin of your website.
The cors() function we used also takes an object as a parameter that we can use to pass in some specific configuration options.
So, let's change the cors() middleware's code into the following:
app.use(cors({
  origin: process.env.NODE_ENV === "development" ? "*" : /domain\.com$/
}))
The origin option tells cors what domain or URL to allow requests from. For example, if you set it to http://example.com, only requests from http://example.com will be allowed.
In development mode, we set it to *. This will allow requests from any URL origin.
And in production mode, we'll use a regular expression (/domain\.com$/) to accept requests from a specific domain origin.
For your reference, the /rest-api/index.js file should now look like this:
const express = require("express")
const helmet = require("helmet")
const cors = require("cors")

const PORT = process.env.PORT || 5000

const app = express()

app.use(helmet())

app.use(cors({
  origin: process.env.NODE_ENV === "development" ? "*" : /domain\.com$/
}))

app.listen(PORT, function () {
  console.log(`Express app listening on port ${PORT}`)
})
Before moving on, verify that your application is still running without any errors.
Add Express Parser Middleware
The last thing we need to do is add the Body-Parser package to the application as Express middleware.
The Body-Parser package is required for us to "read" the body of any incoming JSON requests.
You can install it with this command:
npm install --save body-parser
Then, you need to require() the NPM package in the /rest-api/index.js file so it's available for use:
const bodyParser = require("body-parser")
After that, you need to add these two lines of code to create the Express middleware:
app.use(bodyParser.json())
app.use(bodyParser.urlencoded({ extended: false }))
The first middleware (bodyParser.json()) will allow the REST API application to parse JSON data sent to the REST API. And the second middleware (bodyParser.urlencoded()) will allow your application to parse urlencoded request bodies.
When you're done making edits, the /rest-api/index.js file should look like this:
const express = require("express")
const helmet = require("helmet")
const cors = require("cors")
const bodyParser = require("body-parser")

const PORT = process.env.PORT || 5000

const app = express()

app.use(helmet())

app.use(cors({
  origin: process.env.NODE_ENV === "development" ? "*" : /domain\.com$/
}))

app.use(bodyParser.json())
app.use(bodyParser.urlencoded({ extended: false }))

app.listen(PORT, function () {
  console.log(`Express app listening on port ${PORT}`)
})
Save the changes you made to the file and verify your application is still running without errors.
The REST API is now bootstrapped and ready to be built upon!
In the next section, we'll create and connect to a MongoDB database.
2. Create & Connect To A New MongoDB Database
For the database, we're going to use the Atlas service to create a MongoDB database in the cloud.
Atlas will allow us to quickly get a MongoDB database running in the cloud, will handle all the security and headache-inducing aspects of managing a database, and has a generous free-tier for you to use as well.
In this section of the course, we'll create the database and then connect to it via the REST API application. We'll also go over how to securely store your database credentials.
Let's get to it!
Create A MongoDB Database Using Atlas
First, you'll need to log into the Atlas website or create a free account if you haven't already.
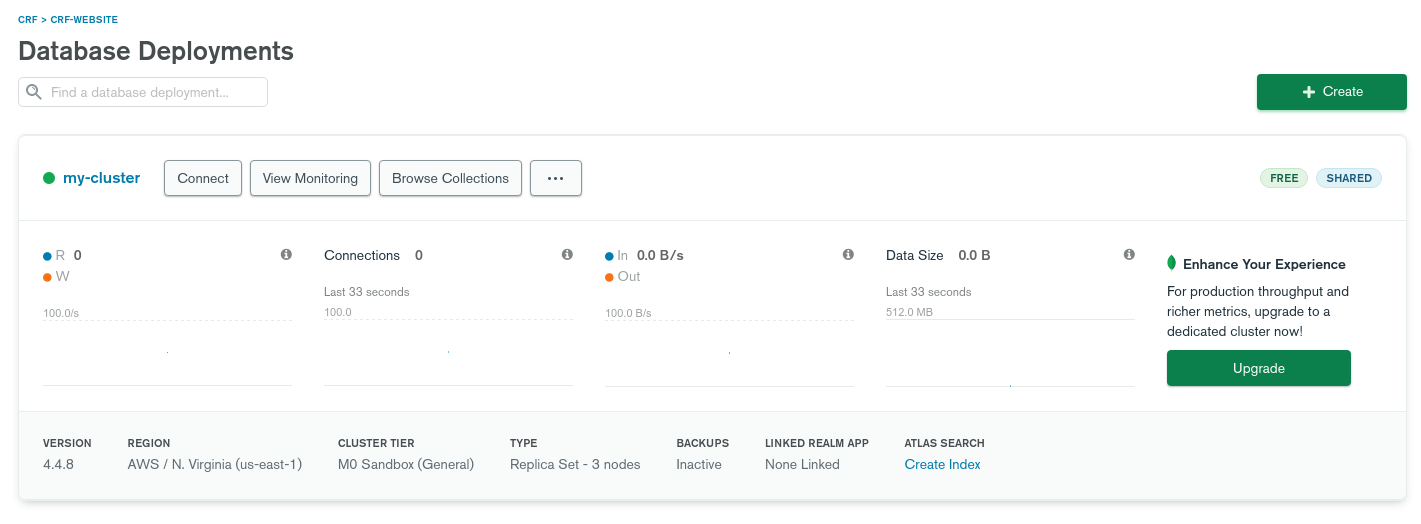
After successfully logging in or signing up, navigate to the create a cluster page if they didn't already redirect you there. The page should look similar to the image below.
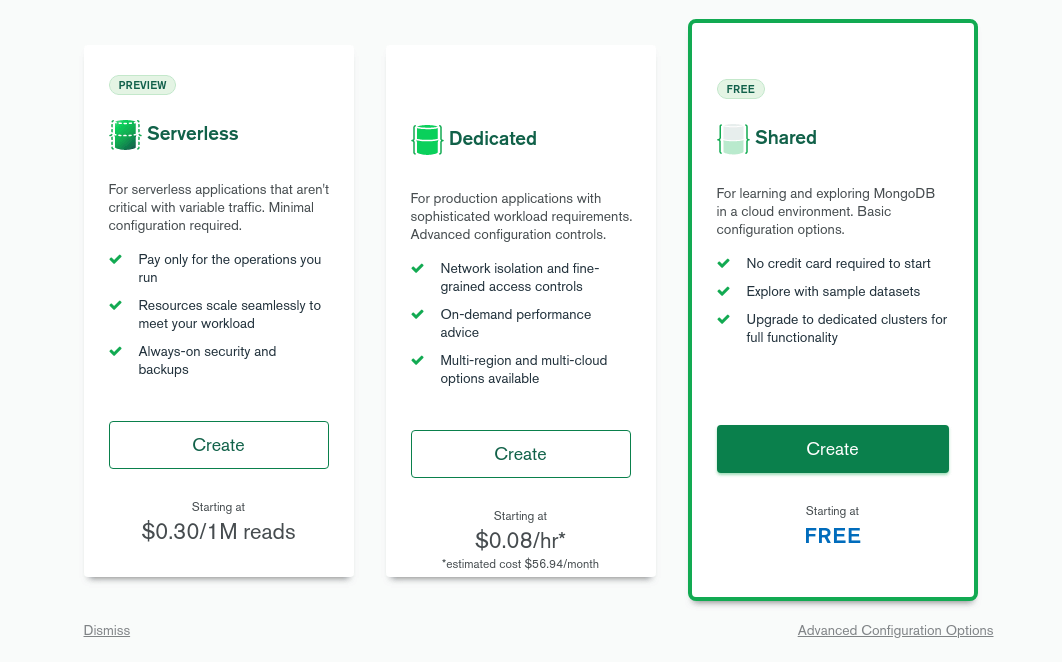
To begin, choose the free cluster option. This will give you more than enough horsepower to start with.
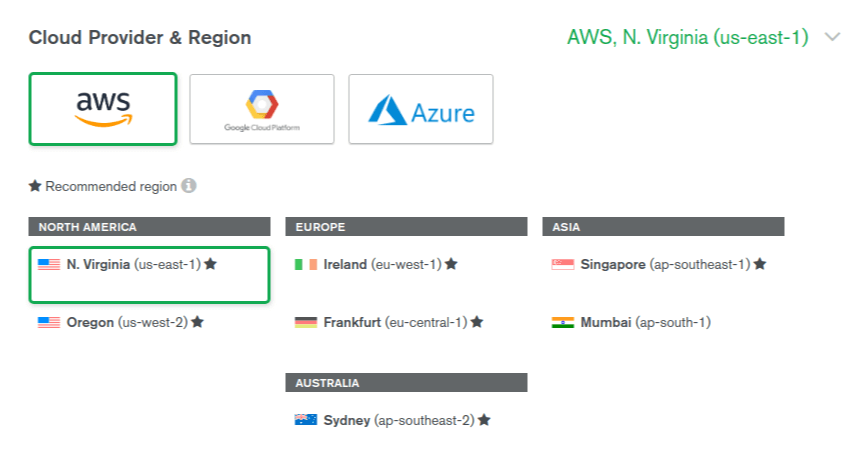
This will redirect you to a page where you can choose some configuration settings for the server your database will run on.
The first option is the cloud provider and region, which is the location of the server housing your database. Choose the option that is in the closest geographic proximity to where your visitors will be physically located. The closer a request is to the server, the faster it will be fulfilled.
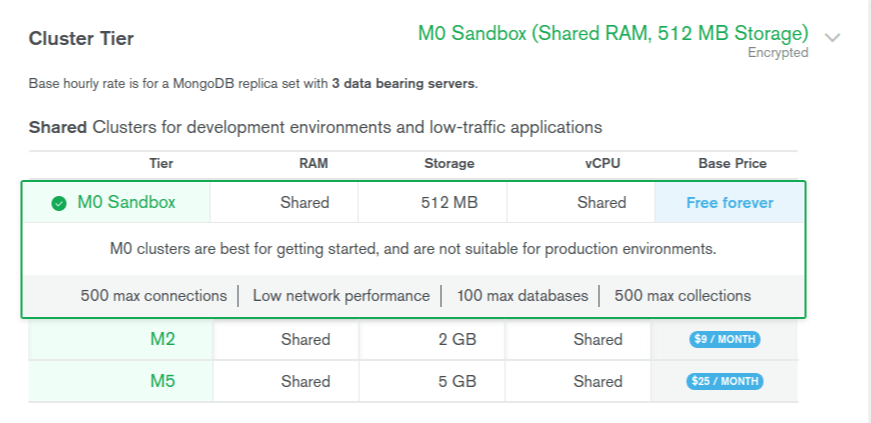
In the next section, you can choose from a set of cluster tiers with different storage and bandwidth capabilities. Ensure the free option is selected before proceeding.
After that, you can skip the Additional Settings section.
Last, give your cluster a name that will be displayed in your account control panel.
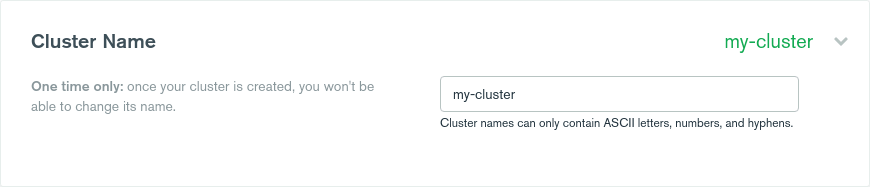
When you've gone through each section, hit the Create Cluster button to initiate the creation of your new database.

It will take a few minutes for Atlas to create the cluster in their system. When the process is complete, you should see your new database cluster on a page that looks like the image below.
Before you can use the new database for anything, you'll need to first secure it by adding your IP address to the connection whitelist and then create a MongoDB username and password for the database.
Click on the Connect button in the cluster dashboard area. This will open a dialog box that will guide you through configuring some security settings for the database.
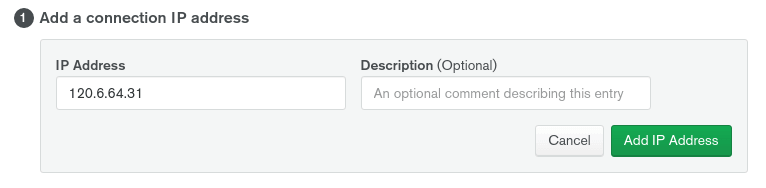
First, click on the Add Your Current IP Address button and verify that Atlas has populated the input field with the correct IP address matching your local development machine.

If it's correct, click the Add IP Address button to add your IP address to the whitelist. This will allow you to successfully connect to the database.
In the bottom section labeled Create a MongoDB User, enter a username and password for a new MongoDB database user. These are the credentials you'll use to read and write data to and from the database.
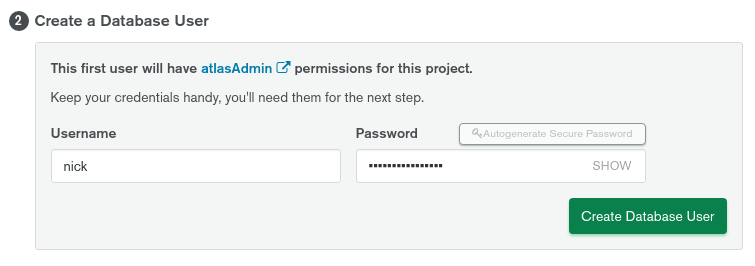
When you've added a username and password, click on the Create MongoDB User button to generate the new user.
With both the Whitelist a connection IP address and Create a MongoDB User sections complete, you can click the Choose a connection method button to move on to the next step.
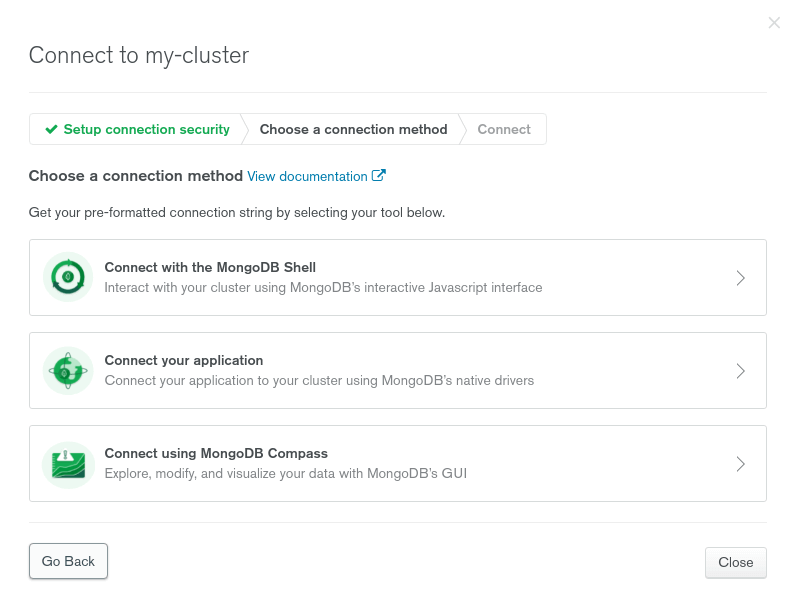
There are three different ways to connect to your new database, including the Mongo Shell, using a MongoDB native driver alongside your favorite programming language, and using MongoDB's GUI called Compass.
Since we'll be connecting via the Node.js programming language, select the Connect your application option. When you click on that option, a page will be displayed where Atlas generates a connection string you can copy and paste into your application.
Make sure Node.js is selected as the coding language driver. In the second section, a connection string should be generated for you.
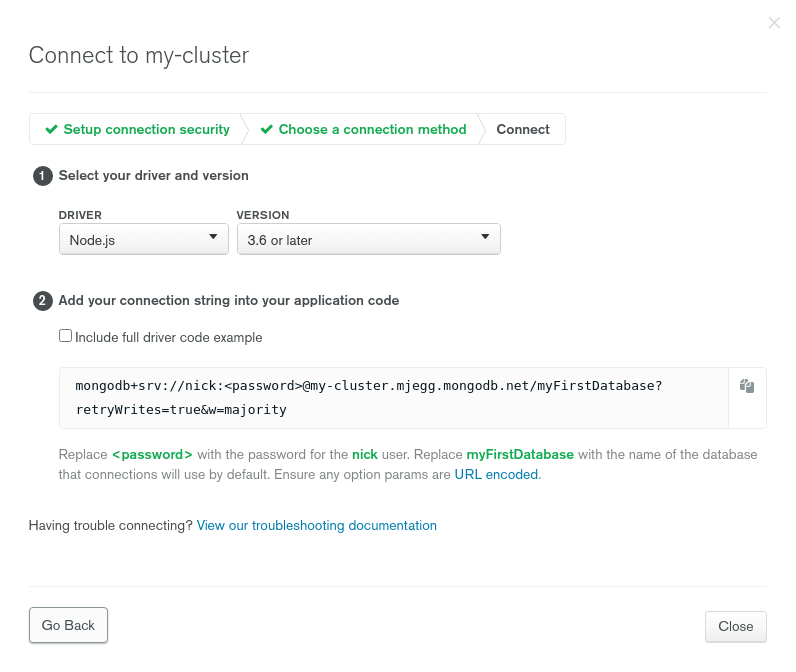
Copy that string to your clipboard. We'll use it to connect to your database.
Connect To The Database
Now we need to add some code to the REST API application to facilitate the interaction between the application and the MongoDB database we just created.
We'll use the Mongoose NPM package to help us manage our MongoDB data and schemas. Therefore, we need to install it into the project dependencies.
You can install the package with this command:
npm install --save mongoose
Now we can require() and use the mongoose NPM package in the /pages/index.js file of your application:
const mongoose = require("mongoose")
Make sure you have the connection string handy from the last section. It should look similar to this:
mongodb+srv://<username>:<password>@my-cluster.mjegg.mongodb.net/myFirstDatabase?retryWrites=true&w=majority
Re-open the /rest-api/index.js file in your code editor and add this code block to it (place it below the const app = express() variable):
const mongoString = "YOUR_CONNECTION_STRING"

mongoose.connect(mongoString)

mongoose.connection.on("error", function(error) {
  if (process.env.NODE_ENV === "development") {
    console.log(error)
  }
})

mongoose.connection.on("open", function() {
  console.log("Connected to MongoDB database.")
})
The mongoString variable stores the connection string to your MongoDB database. Make sure you use the connection string and username/password provided to you on the Atlas website.
Using that connection string, we connect to the MongoDB database using the mongoose.connect() method.
Then, we added some code to listen for both any errors that occur and the successful connection to the database. We use the mongoose.on() method to listen for those events.
If an error occurs after the initial connection is made, we want to console.log() the error so we understand what happened. And we also want to log a success message when the application initially connects to the database.
For your reference, the /rest-api/index.js file should look similar to this:
const express = require("express")
const helmet = require("helmet")
const cors = require("cors")
const bodyParser = require("body-parser")
const mongoose = require("mongoose")

const PORT = process.env.PORT || 5000

const app = express()

const mongoString = "YOUR_CONNECTION_STRING"

mongoose.connect(mongoString)

mongoose.connection.on("error", function(error) {
  if (process.env.NODE_ENV === "development") {
    console.log(error)
  }
})

mongoose.connection.on("open", function() {
  console.log("Connected to MongoDB database.")
})

app.use(helmet())

app.use(cors({
  origin: process.env.NODE_ENV === "development" ? "*" : /domain\.com$/
}))

app.use(bodyParser.json())
app.use(bodyParser.urlencoded({ extended: false }))

app.listen(PORT, function () {
  console.log(`Express app listening on port ${PORT}`)
})
Save the /rest-api/index.js file and start the application again in your terminal (it should automatically reload if it was already running with Nodemon):
npm run dev
If everything went as planned, you should see two output messages in the terminal:
Express app listening on port 5000
Connected to MongoDB database.
If you see the Connected to MongoDB database. message, it means you've connected to the MongoDB database.
If you run into errors, verify that the code matches what we provided above and that your connection string username and password credentials match what you created on the Atlas website dashboard.
Also, verify that you have whitelisted the correct IP address. Otherwise, you're local development machine may be blocked from connecting.
Once you have everything connected and working, we can move on to the next step!
Store Database Credentials As Environment Variables
An additional thing you'll want to do is create a .env file for the application and use it to store your database credentials.
For instance, if you push your code to GitHub (or GitLab), you can add a .env declaration to your .gitignore file to exclude your credentials from being pushed with your code.
This process will greatly limit the chance of your credentials being accidentally revealed to others by controlling what environments they show up in (i.e. only on your local development or production server machines).
First, create a new .env file in the root of your /rest-api directory:
touch .env
Then, add these two environment variables to it:
DB_USERNAME=username
DB_PASSWORD=password
Make sure you add your actual credentials for both the DB_USERNAME and DB_PASSWORD values. And then save the file.
Now we need a way to load the variables from the .env file into the application so we can access them via process.env.DB_USERNAME or process.env.DB_PASSWORD in the code.
To make this easy, we'll use the Dotenv NPM package to facilitate the loading and use of .env variables in the code.
You can install it with this command:
npm install --save dotenv
To get this working in your code, we need to require() the NPM package into the /rest-api/index.js file:
const dotenv = require("dotenv")
And use the dotenv.config() line of code to initiate the package in the index.js file (place it directly below the package require() code):
dotenv.config()
Once you initiate the dotenv configuration file with dotenv.config(), the variables from your .env file will be available for use.
Now you can update your connection string to use the environment variables in the .env file.
Here's an example of what that looks like:
const mongoString = `mongodb+srv://${process.env.DB_USERNAME}:${process.env.DB_PASSWORD}@my-cluster.mjegg.mongodb.net/myFirstDatabase?retryWrites=true&w=majority`
We replace the username and password in your MongoDB connection string (const mongoString) with the process.env.DB_USERNAME and process.env.DB_PASSWORD variables. And we use ES6 template literals to embed the variables directly into the string.
For your reference, the entire /pages/index.js file should look like the following:
const express = require("express")
const helmet = require("helmet")
const cors = require("cors")
const bodyParser = require("body-parser")
const mongoose = require("mongoose")
const dotenv = require("dotenv")

dotenv.config()

const PORT = process.env.PORT || 5000

const app = express()

const mongoString = `mongodb+srv://${process.env.DB_USERNAME}:${process.env.DB_PASSWORD}@my-cluster.mjegg.mongodb.net/myFirstDatabase?retryWrites=true&w=majority`

mongoose.connect(mongoString)

mongoose.connection.on("error", function(error) {
  if (process.env.NODE_ENV === "development") {
    console.log(error)
  }
})

mongoose.connection.on("open", function() {
  console.log("Connected to MongoDB database.")
})

app.use(helmet())

app.use(cors({
  origin: process.env.NODE_ENV === "development" ? "*" : /domain\.com$/
}))

app.use(bodyParser.json())
app.use(bodyParser.urlencoded({ extended: false }))

app.listen(PORT, function () {
  console.log(`Express app listening on port ${PORT}`)
})
Save the file when you're done editing and make sure the application is restarted. You shouldn't see any errors and it should be running in your terminal like it was before.
That was the last step to create and connect to your MongoDB database.
3. Add, Get, Update, & Delete Database Data
Now that we've bootstrapped a REST API application and connected it to a MongoDB database, let's go over how to interact with the database.
In this section we'll go over the following:
- Create a database model we'll use to interact with the database.
- Configure API routes for your application.
- Add data to the database.
- Retrieve data that has been saved to the database.
- Update data in the database.
- Delete data from the database.
Let's walk through each of those steps!
Create A Mongoose Database Model
Before we can interact with the database, we need to give Mongoose a model so it can read documents in the MongoDB database.
First, you'll need a new directory called /models to store all your database model files.
Execute this command to create the new directory in the root of your project folder:
mkdir models
The full path of the directory should be /rest-api/models.
Then, cd into the new directory:
cd models
As an example, we'll be adding data to the database pertaining to foods. Feel free to replace that data with whatever pertains to your application.
Create a new file in that directory named food.js:
touch food.js
Then, add this code to it:
const mongoose = require("mongoose")

const FoodSchema = new mongoose.Schema({
  name: {
    type: String,
    unique: true,
    required: true
  },
  calories: {
    type: Number
  },
  description: {
    type: String
  }
})

FoodSchema.index({name: 1}, {unique: true})

module.exports = mongoose.model("Food", FoodSchema)
First, we create what's called a Mongoose Schema with the new mongoose.Schema() class. Each key in the FoodSchema code defines a property in the documents that will be added to the MongoDB database:
name: the unique identifier given to each food. Duplicates of this will not be allowed in the database (viaunique: true). Therequired: trueoption won't allow a document to be saved if it doesn't have anameproperty.calories: the number of calories a given food has.description: a short description of the food.
To use the schema definition, we need to convert the FoodSchema variable into a Mongoose Model we can work with.
To do that, we pass it into the mongoose.model("Food", FoodSchema) method. We then export the model so we can require() and use it in other files where we interact with the database.
We also define a MongoDB Index with the FoodSchema.index() method.
Without indexes, MongoDB must perform a collection scan, i.e. scan every document in a collection, to select those documents that match the query statement. If an appropriate index exists for a query, MongoDB can use the index to limit the number of documents it must inspect.
For the FoodSchema model, we'll index documents based on the name key. Therefore, when we query the database using that value, the query will be much faster and take less computing power.
Configure API Routes
Now that we have the food database model created, let's add a new /routes directory to your application that will store all the code for your API routes.
In your terminal, navigate to the root of the /rest-api project folder and create the new directory:
mkdir routes
The full path of the directory should be /rest-api/routes.
Then, cd into the new directory:
cd routes
To keep your route code organized, you should separate each route category (i.e. foods, users, etc.) into its own sub-directory.
So, let's create a directory that will store all the route code pertaining to food:
mkdir foods
And then cd into it:
cd foods
Inside that directory, we'll separate the code into two files:
index.js: will handle the URL endpoints that the website will use to make requests to the REST API.api.js: will handle the direct interactions with the MongoDB database.
Create those two files inside the /routes/foods directory with this command:
touch index.js api.js
Then, let's add some starter code to each file to get things going.
First, open the index.js file and add this code to it:
const express = require("express")

const api = require("./api.js")

const app = express.Router()

// API ENDPOINT CODE WILL GO HERE

module.exports = app
This file is where we'll build all the individual routes for any user-related requests to the REST API.
The const app = express.Router() creates an Express instance that will be used as middleware in your application. When we start building the routes, we'll put them where the // API ENDPOINT CODE WILL GO HERE line of code is placed now.
The last thing we do is export the app Express middleware instance.
Next, let's add some initial code to the api.js file as well:
const FoodModel = require("../../models/food.js")

module.exports = {
  // FUNCTIONS WILL GO HERE
}
For now, we simply import the FoodModel we just built and create a module.exports object. Inside that object, we'll create functions that can be imported and used in other files (specifically the /routes/foods/index.js file in this case).
Also, each function will have a callback function as one of its parameters. This will ensure that our route code waits until the database query is finished before sending the response back to the browser or application that made the request.
The last thing we need to do is tell Express to use the API route file (/routes/foods/index.js) that we just created.
To do this, open the /rest-api/index.js file that serves as the entry point to the application. We need to add this line of code to the bottom of the file, but before the app.listen() statement:
app.use(require("./routes/foods/index.js"))
After that's been added, the entire file should look like this:
const express = require("express")
const helmet = require("helmet")
const cors = require("cors")
const bodyParser = require("body-parser")
const mongoose = require("mongoose")
const dotenv = require("dotenv")

dotenv.config()

const PORT = process.env.PORT || 5000

const app = express()

const mongoString = `mongodb+srv://${process.env.DB_USERNAME}:${process.env.DB_PASSWORD}@my-cluster.mjegg.mongodb.net/myFirstDatabase?retryWrites=true&w=majority`

mongoose.connect(mongoString)

mongoose.connection.on("error", function(error) {
  if (process.env.NODE_ENV === "development") {
    console.log(error)
  }
})

mongoose.connection.on("open", function() {
  console.log("Connected to MongoDB database.")
})

app.use(helmet())

app.use(cors({
  origin: process.env.NODE_ENV === "development" ? "*" : /domain\.com$/
}))

app.use(bodyParser.json())
app.use(bodyParser.urlencoded({ extended: false }))

app.use(require("./routes/foods/index.js"))

app.listen(PORT, function () {
  console.log(`Express app listening on port ${PORT}`)
})
Now we can start interacting directly with the database.
Add Data To The Database
To start, let's create an API route that adds a new food document to the database.
When a new food is added to the database, a POST type request will be made to the "/foods/create-new-food" API endpoint. In that request, data for the food's name, calorie count, and description will be included.
Let's configure your REST API to handle those types of requests.
Open the /routes/foods/index.js file and add this code to it (replace // API ENDPOINT CODE WILL GO HERE):
app.post("/foods/create-new-food", function(req, res) {
  // next code block goes here

})
This code configures your application to take POST requests at the "/foods/create-new-food" URL endpoint.
The data related to the new food item will be stored in the request.body object sent along with the request.
Now we need to handle that data.
To do that, update the code to look like this:
app.post("/foods/create-new-food", function(request, response) {
  if (!request.body.name || !request.body.calories || !request.body.description) {
    response.json({error: true})
  } else {
    api.createNewFood(request.body.name, request.body.calories, request.body.description, function(result) {
      response.json(result)
    })
  }
})
Let's go over each part of that code.
First, we verify that the request contains all of the necessary data for the food's name, calories, and description. If one of those is missing, we return an error response using res.json().
If the request contains all the necessary data, we call a api.createNewFood() function that will be imported from /routes/foods/api.js file.
This function will add the new food to the database and return a response that we'll send back to the external website or application that made the request.
To make sure we're on the right track, the entire /routes/foods/index.js file should look like this:
const express = require("express")

const api = require("./api.js")

const app = express.Router()

app.post("/foods/create-new-food", function(request, response) {
  if (!request.body.name || !request.body.calories || !request.body.description) {
    response.json({error: true})
  } else {
    api.createNewFood(request.body.name, request.body.calories, request.body.description, function(result) {
      response.json(result)
    })
  }
})

module.exports = app
Let's get the api.createNewFood() function created.
Open the /routes/foods/api.js file and add this function to the module.exports object (replace // FUNCTIONS WILL GO HERE):
createNewFood: function(name, calories, description, callback) {
  // next code block goes here

}
When the createNewFood() function is called, it will take four parameters:
nameof the food.- The number of
caloriesthe food has. - A short
descriptionof the food item. - A
callbackthat's used to return an object when the function is finished.
Inside the function, we can now save the food to the database.
To do that, update the function's code to the following:
createNewFood: function(name, calories, description, callback) {
  const newFood = new FoodModel({
    name: name,
    calories: calories,
    description: description
  })

  newFood.save(function(error, newItem) {
    if (error) {
      callback({error: true})
    } else {
      callback({success: true})
    }
  })
}
In this code, we create a new database document using the new FoodModel({}) method.
In the new document, we include the name, calories, and description values passed to the function as parameters.
Then, we save the new food document to the database using the save() Mongoose method.
When the database update is complete, we use the callback() to end the function and return a success object.
If an error occurs, we send an error message back instead.
To make sure we're on the right track, the entire /routes/foods/api.js file should look like this:
const FoodModel = require("../../models/food.js")

module.exports = {
  createNewFood: function(name, calories, description, callback) {
    const newFood = new FoodModel({
      name: name,
      calories: calories,
      description: description
    })

    newFood.save(function(error, newItem) {
      if (error) {
        callback({error: true})
      } else {
        callback({success: true})
      }
    })
  }
}
The API route is now complete!
Before moving on, verify that your application is running without any errors.
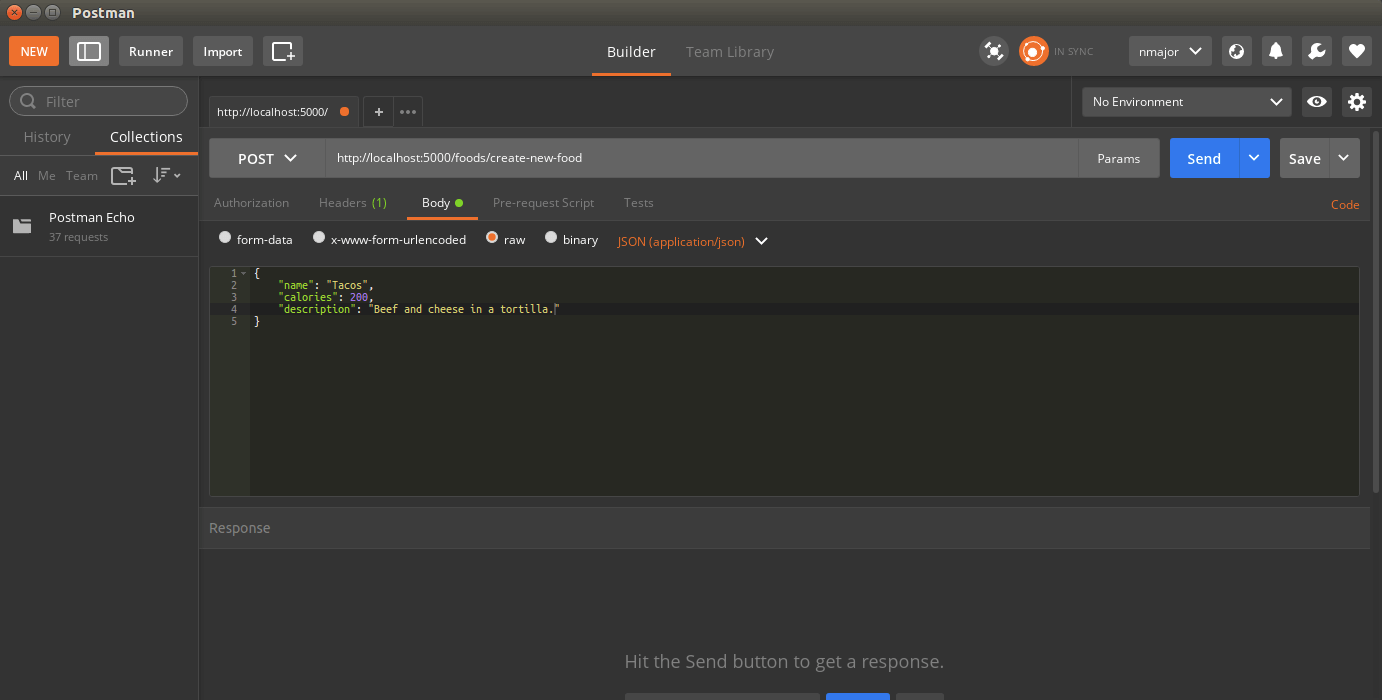
To test this, we need to send a POST request to the "/foods/create-new-food" URL endpoint.
In the request body, the food item's name, calories count, and description need to be included.
You can do that using Postman:
Or using curl:
curl -X POST -H "Content-Type: application/json" -d '{"name": "Tacos", "calories": 200, "description": "Beef and cheese in a tortilla."}' http://localhost:5000/foods/create-new-food
If the request was made successfully, you should get a {success: true} response back from the REST API.
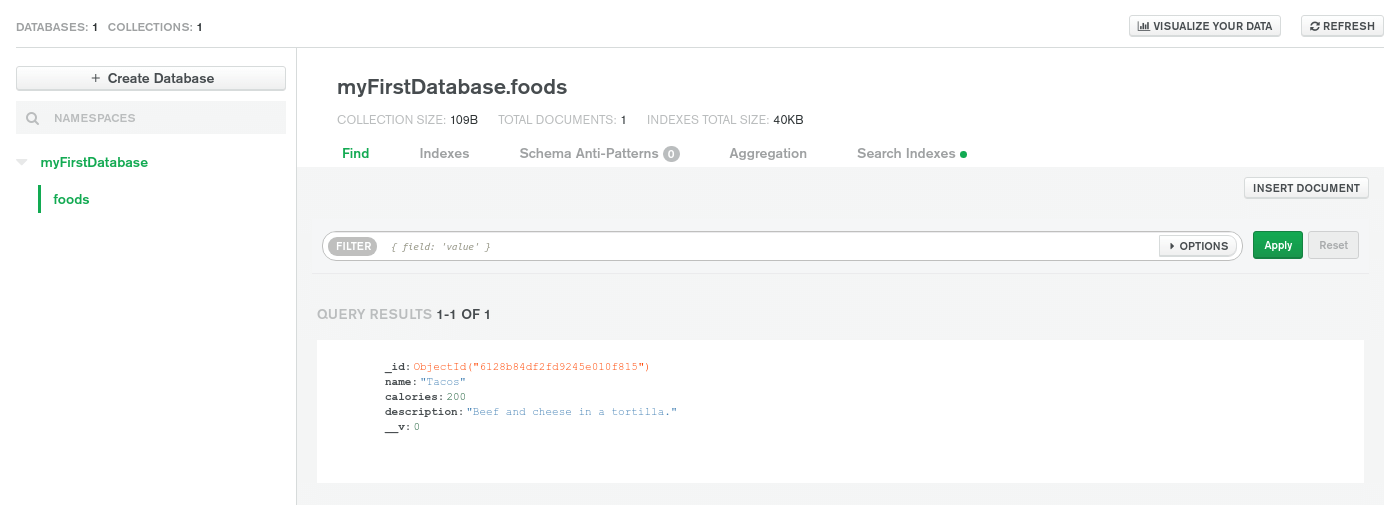
After you make the request, head over to your Atlas MongoDB database dashboard. You should see the new food document added to the database.
Get Database Data
Next, let's retrieve data from the database using a GET request.
Open the /routes/foods/index.js file and add this block of code to it:
app.get("/foods/get-all-foods", function(request, response) {
  api.getAllFoods(function(result) {
    response.json(result)
  })
})
This block of code configures your application to handle GET requests at the "/foods/get-all-foods" URL endpoint.
To retrieve the foods from the database, we'll use a api.getAllFoods() function. This is a function we'll build and import from the /routes/foods/api.js file.
For your reference, the entire /routes/foods/index.js file should look like this:
const express = require("express")

const api = require("./api.js")

const app = express.Router()

app.post("/foods/create-new-food", function(request, response) {

  . . .

})

app.get("/foods/get-all-foods", function(request, response) {
  api.getAllFoods(function(result) {
    response.json(result)
  })
})

module.exports = app
Let's get the api.getAllFoods() function built next.
Open the /routes/foods/api.js file and add this function to the module.exports object:
getAllFoods: function(callback) {
  FoodModel.find({}).lean().exec(function(error, foods) {
    if (error) {
      callback({error: true})
    } else {
      callback({success: true, foods: foods})
    }
  })
}
In this function, we use the find() MongoDB query to get all the foods currently stored in the database.
When the query is finished, the function will return the foods data using the callback().
The foods data will be in the form of an array of objects where each food item is an object.
For your reference, the /routes/foods/api.js file should look like this:
const FoodModel = require("../../models/food.js")

module.exports = {
  createNewFood: function(name, calories, description, callback) {

    . . .

  },
  getAllFoods: function(callback) {
    FoodModel.find({}).lean().exec(function(error, foods) {
      if (error) {
        callback({error: true})
      } else {
        callback({success: true, foods: foods})
      }
    })
  }
}
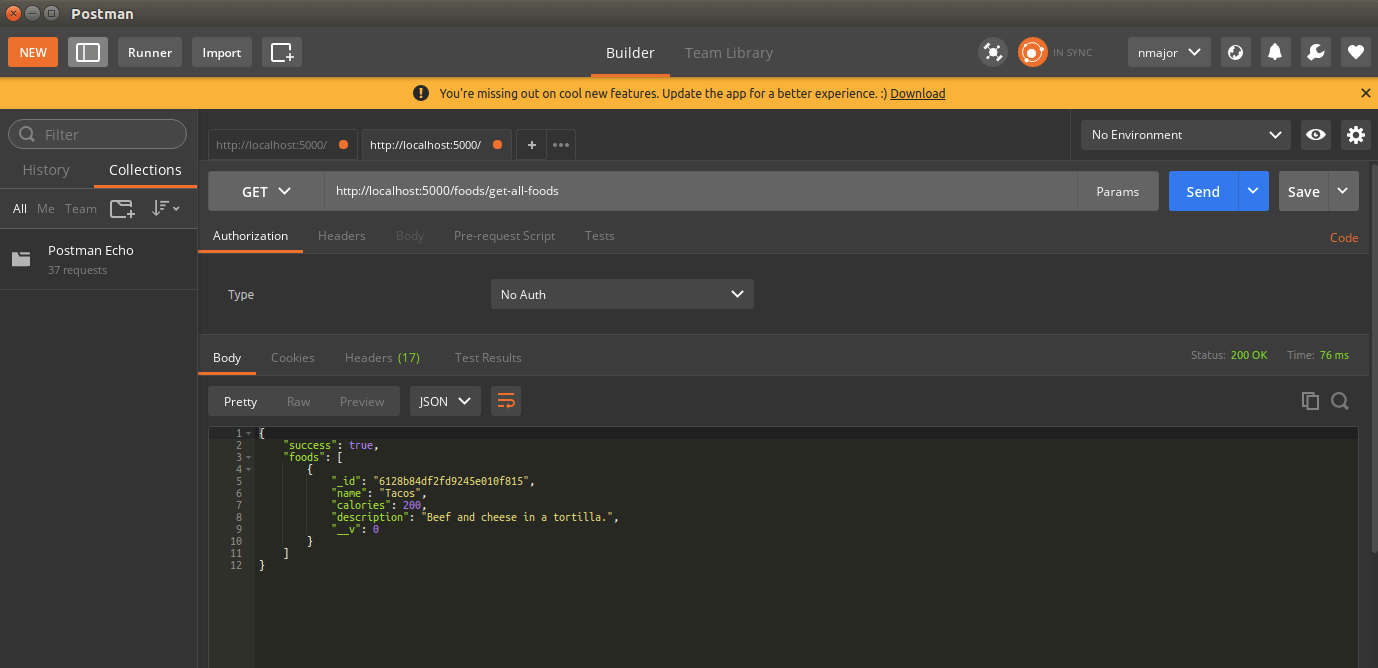
The API route is ready to test!
Here's what the Postman request would look like:
And the curl request:
curl http://localhost:5000/foods/get-all-foods
The response from the REST API should contain an array of objects containing each food you've added to the database.
{"success":true, "foods":[{"_id":"6128b84df2fd9245e010f815","name":"Tacos","calories":200,"description":"Beef and cheese in a tortilla.","__v":0}]}
Update Database Data
Next, let's go over how you'd update a food item that's already been saved to the database.
As an example, let's create an endpoint used for changing a food's description.
Open the /routes/foods/index.js file and add this code block to it:
app.put("/foods/change-food-description", function(request, response) {
  if (!request.body.name || !request.body.newDescription) {
    response.json({error: true})
  } else {
    api.changeFoodDescription(request.body.name, request.body.newDescription, function(result) {
      response.json(result)
    })
  }
})
This code configures your REST API to take PUT requests at the "/foods/change-food-description" URL endpoint.
In the request body, there should be both a name and newDescription value.
The name value will be used to retrieve the correct food from the database. And the newDescription value will be saved to the database as the new description for the food.
For your reference, the entire /routes/foods/index.js file should look like this:
const express = require("express")

const api = require("./api.js")

const app = express.Router()

app.post("/foods/create-new-food", function(request, response) {

  . . .

})

app.get("/foods/get-all-foods", function(request, response) {

  . . .

})

app.put("/foods/change-food-description", function(request, response) {
  if (!request.body.name || !request.body.newDescription) {
    response.json({error: true})
  } else {
    api.changeFoodDescription(request.body.name, request.body.newDescription, function(result) {
      response.json(result)
    })
  }
})

module.exports = app
Let's get the api.changeFoodDescription() function created.
Open the /routes/foods/api.js file and add this function to the module.exports object:
changeFoodDescription: function(name, newDescription, callback) {
  // next code block goes here

}
When the changeFoodDescription() function is called, it will take name, newDescription, and a callback() function as parameters.
Before we can update the food, we need to verify that it exists in the database.
To do that, update the function's code to the following:
changeFoodDescription: function(name, newDescription, callback) {
  FoodModel.findOne({name: name}).exec(function(error, food) {
    if (error) {
      callback({error: true})
    } else if (!food) {
      callback({notFoundError: true})
    } else {
      // next code block goes here

    }
  })
}
In this code, we use the findOne() query method to get the food from the database with the given name property.
If that food doesn't exist, a notFoundError error message is returned and we don't make any updates in the database.
Once we've verified that the food exists, we can make updates to it.
To do that, update the function's code to this:
changeFoodDescription: function(name, newDescription, callback) {
  FoodModel.findOne({name: name}).exec(function(error, food) {
    if (error) {
      callback({error: true})
    } else if (!food) {
      callback({notFoundError: true})
    } else {
      food.description = newDescription

      food.save(function(error) {
        if (error) {
          callback({error: true})
        } else {
          callback({success: true})
        }
      })
    }
  })
}
In this code, we set the new description value for the food and save the changes to the database using the food.save() method.
When the updates have finished, a {success: true} value is returned by the function using the callback().
Let's put this API route to the test!
Here's what the Postman request would look like:
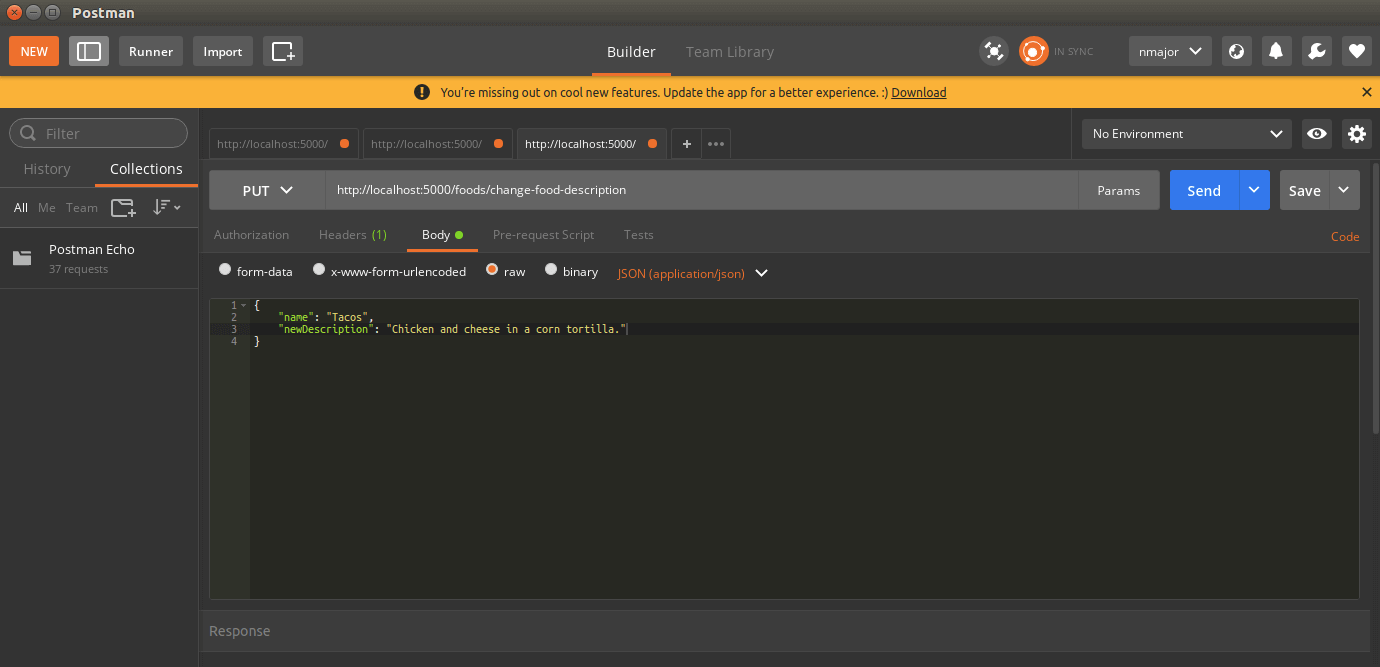
And the curl request:
curl -X PUT -H "Content-Type: application/json" -d '{"name": "Tacos", "newDescription": "Chicken and cheese in a corn tortilla."}' http://localhost:5000/foods/change-food-description
If the food document was successfully updated in the database, you should get this response:
{success: true}
And when you view your database in the Atlas dashboard, you should see the changes have been made.
Delete Database Data
Last, let's go over how to remove a food document from the database.
Open the /routes/foods/index.js file and add this code block to it:
app.delete("/foods/delete-food", function(request, response) {
  if (!request.body.name) {
    response.json({error: true})
  } else {
    api.deleteFood(request.body.name, function(result) {
      response.json(result)
    })
  }
})
This code configures your REST API to handle DELETE requests at the "/foods/delete-food" URL endpoint.
We'll use the food's name property to find and delete it from the database. Therefore, we need to verify that the request body contains a name value before moving on.
After verifying the existence of the request.body.name value, we call a api.deleteFood() function that's imported from the /routes/foods/api.js file.
Let's create the api.deleteFood() function next.
Open the /routes/foods/api.js file and add this function to the module.exports object:
deleteFood: function(name, callback) {
  FoodModel.findOne({name: name}).exec(function(error, food) {
    if (error) {
      callback({error: true})
    } else if (!food) {
      callback({notFoundError: true})
    } else {
      food.remove(function(error) {
        if (error) {
          callback({error: true})
        } else {
          callback({success: true})
        }
      })
    }
  })
}
In this function, we use the findOne() query method to retrieve the food with the given name property from the database.
If the food document is found, we remove it from the database using the food.remove() method.
After the document is removed from the database, we return a {success: true} result.
Let's test the API route!
Here's what the Postman request would look like:
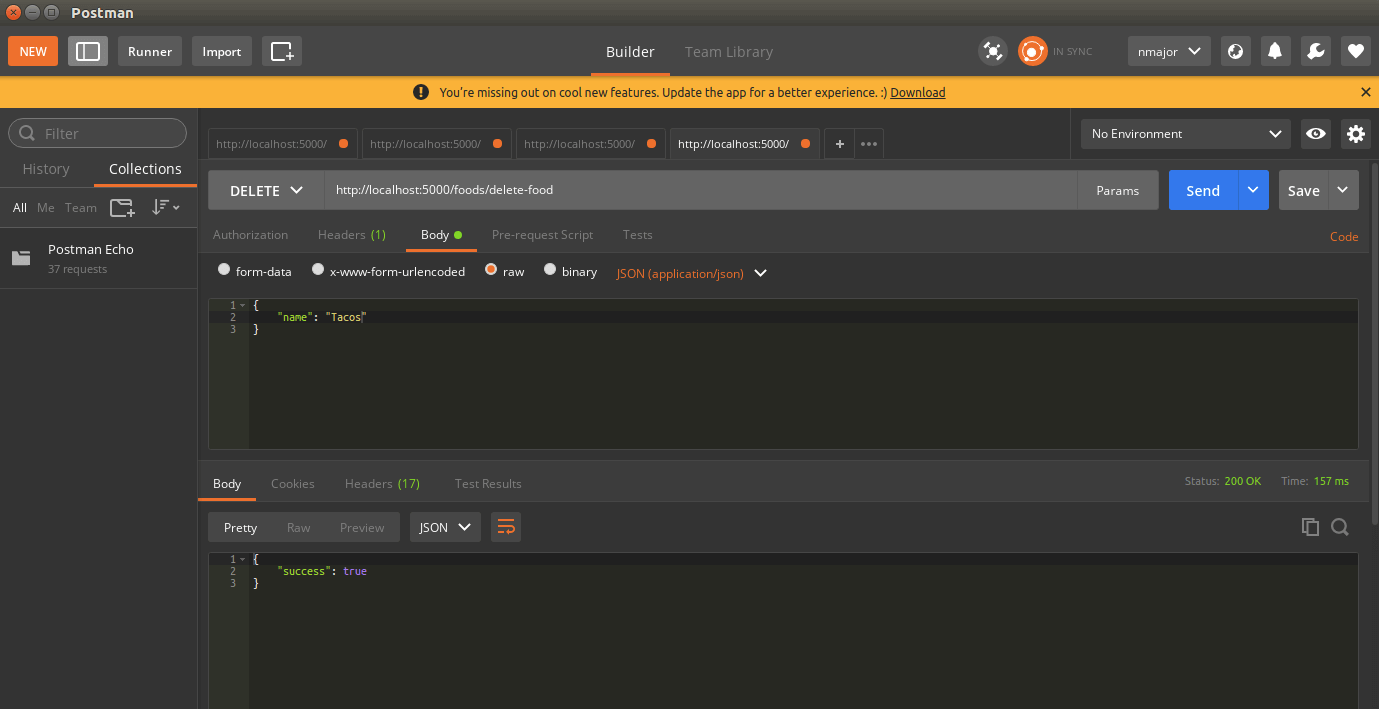
And the curl request:
curl -X DELETE -H "Content-Type: application/json" -d '{"name": "Tacos"}' http://localhost:5000/foods/delete-food
If the food was successfully removed from the database, the response should look like this:
{success: true}
When you view your database in the Atlas dashboard, the food document should be removed.
That was the last step in this guide.