Get A Next.js Website Indexed On Google
Getting indexed on Google and being displayed in their search results is one of the most important things you can do to attract visitors to your website.
In this article, we'll walk through how to get your Next.js website indexed and crawled by Google.
To do this, we'll register your website in the Google Search Console and create a sitemap.xml for them to use when crawling your website.
Before going through this guide, the assumption is that you have a Next.js website created and deployed to a production environment. You can't get your Next.js website indexed on search engines until you have done those two things.
Let's get started!
Get Indexed On Google
To get your Next.js web application indexed on Google, we'll follow these general steps:
- Create a new Google Search Console property.
- Add a property verification tag to your website and deploy the change to production.
- Run the property verification process via the Google Search Console website.
- Add a
sitemap.xmlfile to your website and deploy the change to production. - Register your
sitemap.xmlfile in the Google Search Console.
We'll go through those steps in the sections below.
Create A New Google Search Console Property
If you already have a Google account, make sure you login or use that account for the next steps. It will simplify the process and make it easier to keep all your information in one account.
First, go to the Google Search Console website.
Once you've created an account or logged in, click the Add Property button from the drop-down in the left-hand corner of the page.
It should open a new modal that asks you to enter the property type and domain name of your website.
In that modal, make sure the URL prefix option is selected and enter your website domain (i.e. https://www.example.com).
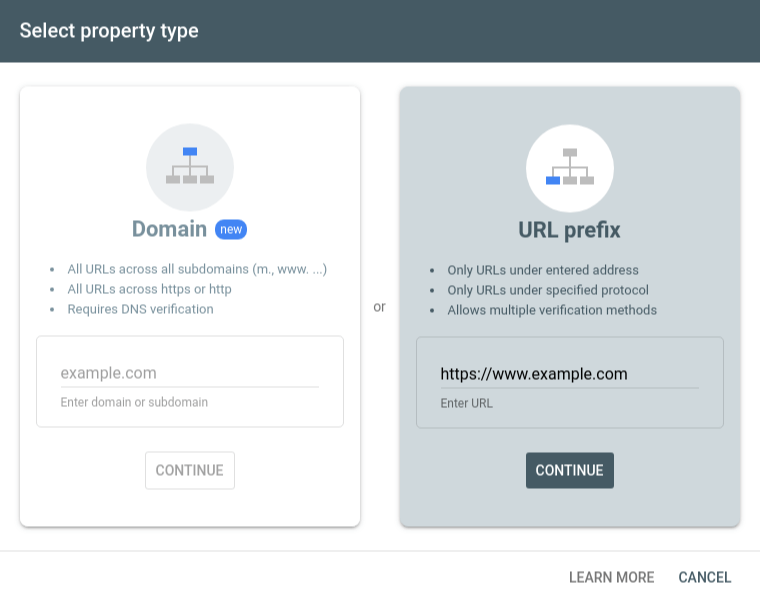
Then, press the Continue button.
Google now needs to verify that you own the property (website) in question. You'll be redirected to a new modal that gives you some options to complete the verification.
Scroll to the HTML Tag option and copy the HTML tag they provide. It should be a <meta> tag that looks similar to this:
<meta name="google-site-verification" content="VERIFICATION_ID" />
Here's a screenshot of what the web page looks like:

We now need to add that <meta> tag to your website code, deploy the code change, and tell Google to run its verification process by going to your website and retrieving the verification ID.
In the next step, we'll add the <meta> tag and deploy the code change.
Leave the Google Search Console window open in your browser. We'll come back to that page after we're done adding the <meta> tag to your website.
Add The Property Verification Tag To Your Website
On your development machine, navigate to your Next.js project directory.
Via your code editor, open the homepage for your site (should be the /pages/index.js file) and add the <meta> tag from Google anywhere inside the <Head> component in the file.
When you're done editing, make sure you save the file. The <meta> verification tag should now be included in the head section of your page:
<Head>

  . . .

  <meta name="google-site-verification" content="VERIFICATION_ID" />

  . . .

</Head>
Then, you need to deploy this change to production. Google won't be able to find the verification tag until you do so.
When you've finished your deployment process, visit your website in a browser and verify that the tag is visible when you view the HTML document for your homepage in the Developer Tools.
You should see the Google verification <meta> tag in the <head> section of your page.
The verification code is now ready for Google to verify.
Run The Property Verification Process
Now we can tell Google to run their script that goes to your website, finds the <meta> tag we just added and verifies that the ID matches what's in their system.
Go back to the browser page you left open in the Google Search Console.
And click the Verify button in the Verify Ownership modal.
If all went well, you should see a success message like the image below.
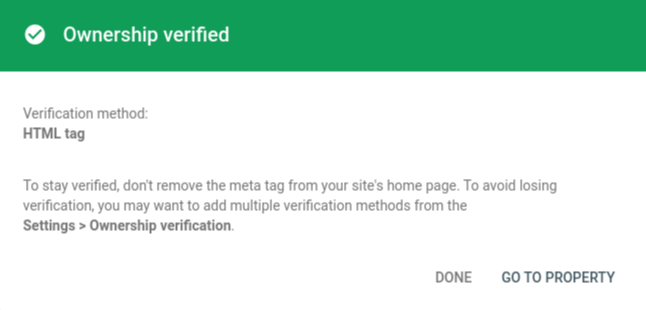
If you receive an error or the verification is unsuccessful, make sure the <meta> tag is deployed on your website with the ID matching what Google provided you with.
Make sure you keep the <meta> tag in the code of your website. This will ensure that your website remains verified with Google.
Hit the Go to Property link in the success window.
This will take you to the Search Console dashboard for your website. Keep this page open in your browser, we'll come back to it later after we create the sitemap.xml file.
Add A Sitemap.xml File To Your Website
Now we need to create a sitemap.xml file for your website.
sitemap.xml is an XML file that holds a complete list of all the page URLs for a given website, along with other additional details for those pages (metadata, last updated date, etc.). Its main purpose is to inform search engines about the pages on your website that you want them to crawl and have displayed in search results.
In the next steps, we'll add the file to your website and make them accessible at the root URL (i.e. www.example.com/sitemap.xml).
First, let's create the sitemap.xml file for your website.
On your development machine, navigate to your Next.js application directory.
We'll want to store the sitemap.xml file in a /public directory positioned in the root of your project directory.
If you don't already have that directory, create one with this command:
mkdir public
Then, create a new file in the /public directory called sitemap.xml:
cd public && touch sitemap.xml
Next.js serves all the files in the /public directory from the root URL of your application. So, this file will be accessible at www.example.com/sitemap.xml in the browser.
Open the new /public/sitemap.xml file in your code editor and add this code to the file:
<?xml version="1.0" encoding="UTF-8"?>
<urlset xmlns="http://www.sitemaps.org/schemas/sitemap/0.9">
    <url>
        <loc>https://example.com</loc>
        <changefreq>daily</changefreq>
        <priority>0.7</priority>
    </url>
</urlset>
For demonstration purposes, we'll only add the homepage to the sitemap. In the future, you'll want every URL on the website to be included in this file.
Before moving on, make sure you've replaced the https://example.com with your domain in the /public/sitemap.xml file.
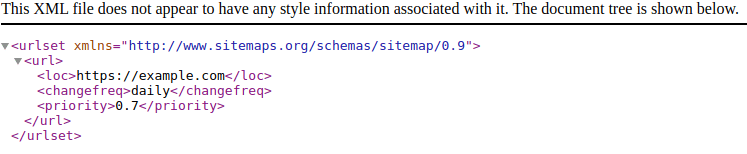
Save the changes you made to the sitemap.xml file and open your browser window to http://localhost:3000/sitemap.xml.
You should see the contents of your XML file displayed on the page.
Then, you need to deploy this change to production to make your sitemap.xml file accessible to the world.
When you've finished your deployment process, visit your website in a browser and verify that the sitemap.xml file is served at this URL: https://example.com/sitemap.xml.
If everything looks good, let's tell Google about the new sitemap.xml file we just created.
Add Your Sitemap.xml File To The Google Search Console
In your browser, go back to the Google Search Console.
You should still be on the dashboard page for the new website property we created. If not, navigate to that page.
Then, go to the Sitemaps page within the dashboard. There should be a link in the left-hand navigation menu that takes you there.
On that page, enter the URL to your sitemap.xml file and press the Submit button. It should look like the image below.
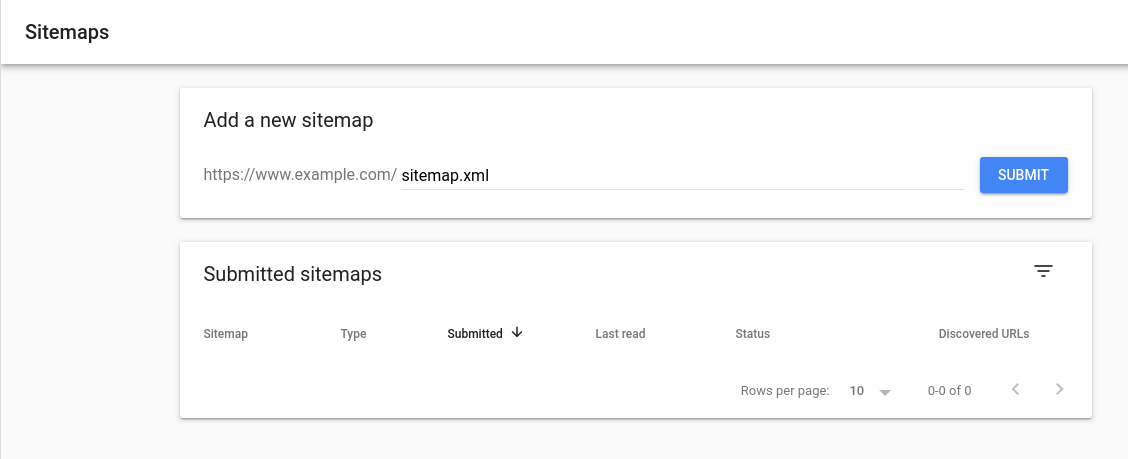
If successful, you should see a success message and there should now be a sitemap added to the Submitted sitemaps section of the page.
Google is now set to index your website using the sitemap.xml file we created!
Thanks for reading and happy coding!