Send Emails With Node.js Using Mailgun & Nodemailer
In this article, we'll go over how to send an email using Mailgun and Node.js. We will also use Nodemailer for handling the nitty-gritty aspect of sending the email and Handlebars for the HTML templating of the email body.
Before working through this article, you'll need Node.js installed. If you need one, we have a guide on installing Node.js.
Let's get started!
Table of Contents
Signup For a Mailgun Account
First things first, we need to create an account at Mailgun to use their email sending services.
Head over to their website and create an account. They will ask for a credit card. But they won't charge you unless you go over their 10,000 free emails per month threshold.
This is a large number of emails to work with before being charged, which makes it perfect for getting started with sending emails.

Once you finished filling out the form, pick the free plan and continue to your account dashboard.
Also, make sure you verify your email account by clicking the link in the email they sent to you.
Assuming everything went smoothly, you should now have an active Mailgun account and you should now be ready to set up your Node.js and start sending emails.
Now we are ready to write the code that sends an email using Node.js.
Send An Email with Mailgun & Nodemailer
First, let's install the NPM packages we'll need to get the emails sent.
Install them with this command:
npm install nodemailer nodemailer-mailgun-transport handlebars --save
Nodemailer is a module for Node.js applications that will allow us to easily send emails. It's the solution most Node.js users turn to by default and will play nicely with Mailgun.
The second NPM package we installed was nodemailer-mailgun-transport. This package is a transport plugin that goes with nodemailer to send emails using Mailgun.
Last, the handlebars package will be used to build HTML templates for our emails.
Create Handlebars Template File
Now, we need to create a file that will serve as our handlebars HTML template (.hbs).
You can create a handlebars template file with this command:
touch template.hbs
Then, add this code to the file:
<html>
  <head>
    <title>Message HTML Title</title>
  </head>
  <body>
    <div>
      <span style="font-weight: bold;">Message: </span>
      <span>{{message}}</span>
    </div>
  </body>
</html>
This file represents the body content of your email and looks like a basic HTML page, but with one caveat in the {{message}} code. This allows you to insert a variable named message into the HTML.
There are several other built-in features that handlebars provides, check out their documentation for more information.
Send An Email
Now, we're ready to send the email!
Here's what the Node.js code will look like to do that:
const nodemailer = require("nodemailer")
const mg = require("nodemailer-mailgun-transport")
const handlebars = require("handlebars")
const fs = require("fs")
const path = require("path")

const emailTemplateSource = fs.readFileSync(path.join(__dirname, "/template.hbs"), "utf8")

const mailgunAuth = {
  auth: {
    api_key: "key-12341234123412341234",
    domain: "One of your domain names listed at your https://mailgun.com/app/domains"
  }
}

const smtpTransport = nodemailer.createTransport(mg(mailgunAuth))

const template = handlebars.compile(emailTemplateSource)

const htmlToSend = template({message: "Hello!"})

const mailOptions = {
  from: "myemail@example.com",
  to: "recipient@domain",
  subject: "EMAIL SUBJECT LINE",
  html: htmlToSend
}

smtpTransport.sendMail(mailOptions, function(error, response) {
  if (error) {
    console.log(error)
  } else {
    console.log("Successfully sent email.")
  }
})
There's a lot to unpack so let's go through it.
The first thing we did was include the three NPM packages we installed before: nodemailer, nodemailer-mailgun-transport, and handlebars. And we also included two Node.js core modules: path and fs.
Then, we import the template.hbs file we created and hold it in a variable called emailTemplateSource. This is where we use the fs and path modules to read the file.
And the next thing we did was create a mailgunAuth object that holds the authorization api_key and domain. You'll notice that we still need to add the api_key and domain values. These can be found in your mailgun account. We'll cover how to acquire those in the next step.
The smtpTransport variable was added next. Here we created a SMTP Transport for Nodemailer using the mailgunAuth object we created.
Next, we created a couple of variables called template and htmlToSend that constructs the HTML that will make up the body of our email. Notice that we passed a message value to the template.
And the last thing we did before sending the email is to create an object with mailOptions, which includes from, to, subject, and html fields.
Finally, the smtpTransport.sendMail method will send the email.
Get Mailgun Api Key and Domain Credentials
Before we can successfully send emails, we need to get the api_key and domain values for the mailgunAuth object we created above in your Node.js file.
To do this, go to your account dashboard on Mailgun.com.
Go to the API Keys area by clicking on the Settings and then API Security links in the side navigation menu.
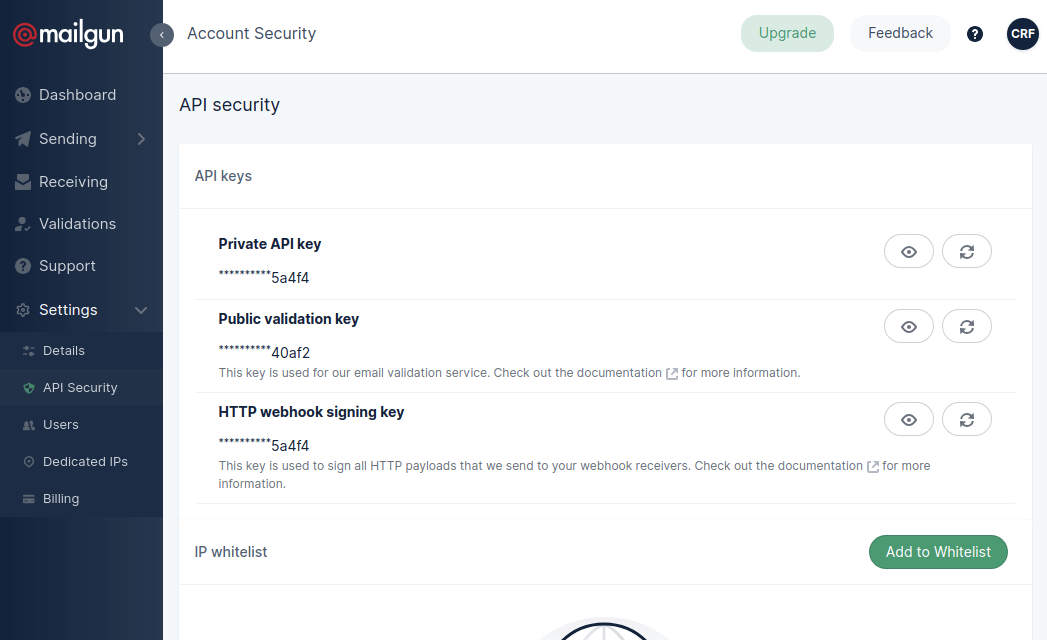
Copy and paste the Private Api Key into the api_key value inside the mailgunAuth object of your Node.js file:
...

api_key: "PAST_API_KEY_HERE",

...
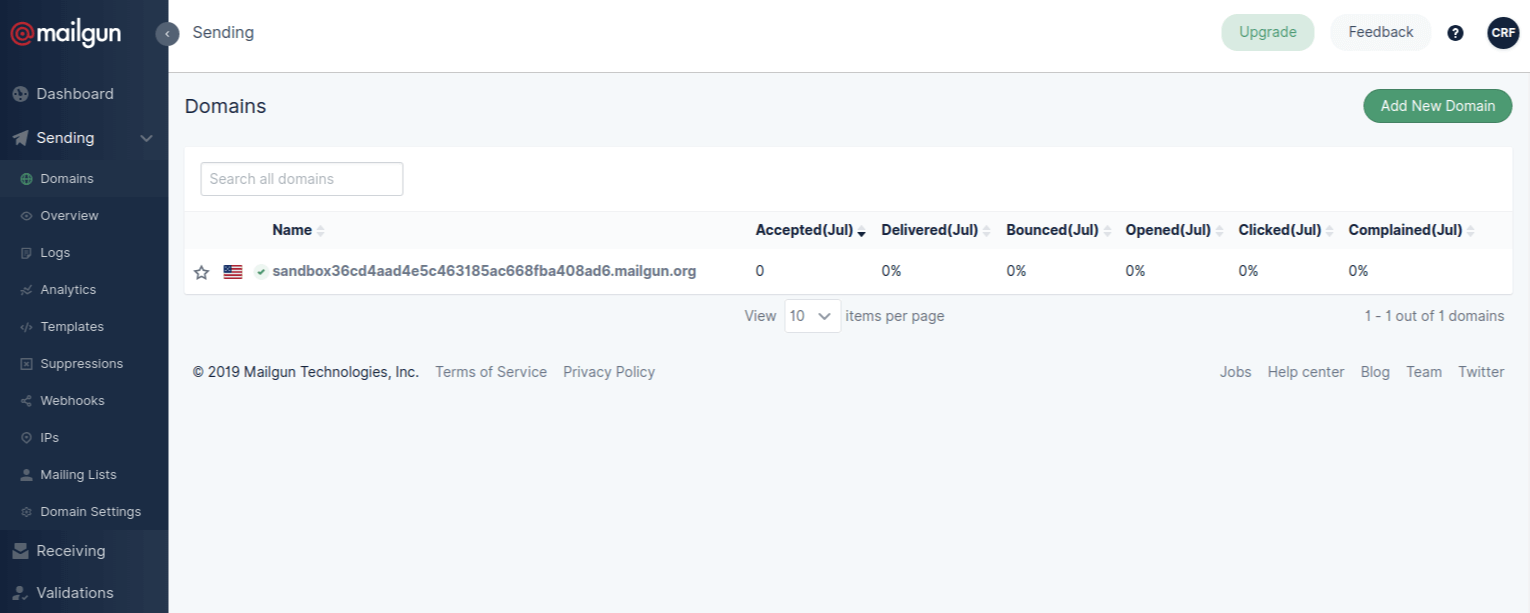
Next, we need our Mailgun sandbox domain we can use for testing. To get yours, got to the domains section of your account dashboard.
Copy and paste the domain name into the domain value in your Node.js file:
...

domain: "PAST DOMAIN NAME HERE",

...
Your API key and domain configuration variables are all set!
Add Your Address to Authorized Recipients
Since we are using a sandbox domain, Mailgun requires us to add our recipient email address to a list of Authorized Recipients for our sandbox domain.
To do this, go back to the domains page on your Mailgun account dashboard and click on the sandbox domain.
On that page, there will be an input form for you to add your email address (the email address you want to send your test emails to). Add it and click the Save Recipient button.
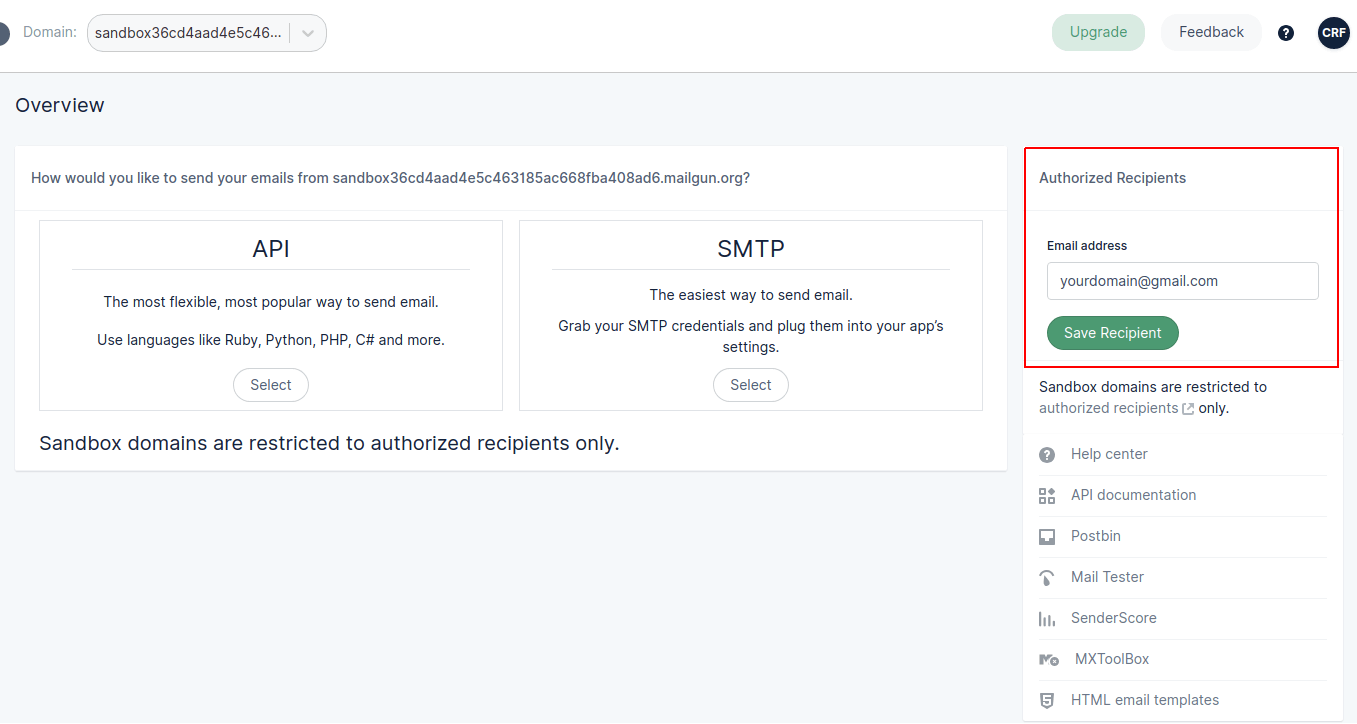
Mailgun will send an email to the email address you gave confirming the email address.
Click on the I Agree button in the email. This will open a webpage prompting you for confirmation. Click the Yes button on that page.
Update Recipient Address in Your Node.js File
The last change we need to make to your Node.js file is to change the to field in the mailOptions object to the email address you want to send to:
...

to: "RECIPIENT EMAIL ADDRESS",

...
Save the file when you have finished making the change.
Test Sending an Email
We are now ready to test sending an email!
Execute the following command to execute your Node.js file:
node app.js
Go to the email address you sent it to. If all went well, the email should pop up in your inbox in a few seconds.
Thanks for reading and happy coding!